The wp-config.php file is a core file on every WordPress installation. It serves as a configuration file for authentication, database, and server settings. It is commonly modified to enable debugging and other advanced options.
To modify wp-config.php, you must access the underlying file system containing the WordPress installation. There are various ways to access this file system depending on your host. This guide describes how to modify the file using FileZilla, a popular SFTP client for Windows and other operating systems.
SFTP (SSH File Transfer Protocol) is a widely supported protocol for securely interacting with a remote file system. If your hosting company does not support SFTP, you can look into other options such as a plugin or online file browser provided by your host.
SFTP Credentials
These instructions assume you have valid SFTP credentials from your hosting company. Many hosting companies offer SFTP as a way to connect to your WordPress installation. Here are instructions for several popular hosts:
- How to get your SFTP credentials for a WordPress site on GoDaddy
- How to get your SFTP credentials for a WordPress site on EasyWP (Namecheap)
For other hosts, try signing into your hosting account and reviewing your server configuration options. You may see an option to connect over SFTP. Otherwise reach out to technical support.
Instructions
- Get your SFTP credentials from your hosting company
You need a username, password, server address, and port. Typically, you must sign into your hosting account to get these values. The default port is 22 so you can try that if your host doesn’t explicitly specify it.
- Start FileZilla
- Enter your host, username, password, and port into the Quick Connect toolbar near the top of the window
You can leave the port blank to use the default of 22.
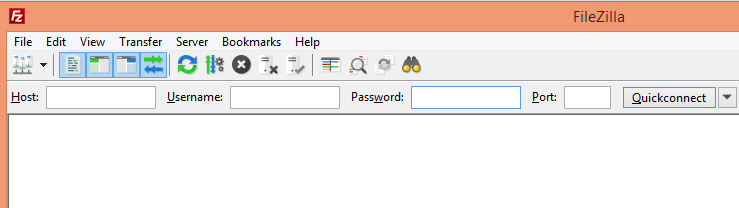
- Click Quick Connect
This lets you establish a connection with default options. You can later save your credentials to a new entry in the Site Manager, which helps you organize connections and set advanced options.
- Familiarize yourself with the user interface
You can click the View menu to add and remove the following sections:
Message log: By default, you should see a message log under the Quick Connect toolbar. This log shows status and error information. Look here if you encounter any troubles.
Local directory tree: Located on the left side under the message log, this directory represents the local file system (your computer).
Remote directory tree: Located on the right side under the message log, this directory represents the remote file system (your website).
Take a moment to click around the remote file system. You will notice that whenever you select a folder, updates are sent to the message log, and the list of files under the directory is updated. This is the primary way you will locate your remote files.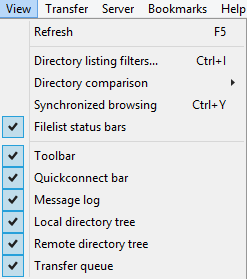
- Locate the root WordPress folder
This is the root folder of your WordPress installation, which may be further down than the very root of the remote file system. Start at the top and work your way down until you find a folder containing the subfolders wp-admin, wp-content, and wp-includes. It is often called html.

- Right-click wp-config.php and select View/Edit

- Select a text editor if prompted
You will be prompted to select an editor when you first open each type of file.
If you select system association, FileZilla will launch the app associated with the extension of the file. Since wp-config.php has an extension of php, it will open the editor associated with the PHP programming language.
If you select the default text editor, FileZilla will launch the default text editor, usually notepad.
Your selection will be remembered, and you can change it later by clicking Edit > Settings > File editing > Filetype associations.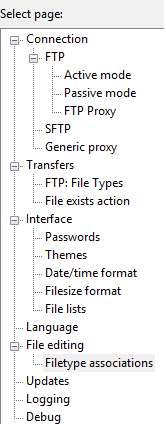
- Wait for the file to download and open in your editor
Once opened, you will be editing a local copy of the file. FileZilla is tracking any changes to the file. Later, you will be prompted to upload your changes.
- Make changes
- Save and return to the FileZilla window
- Decide whether to upload your changes
FileZilla will detect changes to the file and will ask whether you wish to upload the modified file back to the remote system. Click Yes or No. You can indicate that you are done editing and to delete the local file. You don’t have to delete the local file otherwise, and you can keep making changes.
- Test immediately
Your changes to wp-config.php will take effect immediately in WordPress. Right away check your website and ensure the desired effect has been achieved. If not, revert your changes.
Reference
- SSH File Transfer Protocol – Wikipedia – Provides a good writeup of the capabilities and history of SFTP.
Leave a Reply